Lesson Title: Paper Chromatography Lab
Grade Level: 6th-7th grade
Estimated time: 30 minutes

Lesson Objectives:
The students will gain experience with paper chromatography and will learn how science can be used to identify a specific marker. Students can gain hands-on experience with paper chromatography procedures at SMU's Kids Ahead/STEM-Works booth at the festival.
Materials to replicate this activity in the classroom:
o Different types of black markers (examples: Sharpie Permanent, Washable Crayola, Expo Vis-à-vis Wet Erase, Bic Markit Fine Point Permanent, Generic Marker)
o Tape
o Water
o Paper towels
o Pencils
o Strips of blank chromatography paper (pre-cut to 1cm x 7cm each)
o 1 strip of chromatography paper with a sample of ink from the crime scene note (for comparing)
o Popsicle sticks
o Test tubes
o Rulers
o Test tube racks
Lesson Procedure:
1) Activity Set-up:
- The room will be set-up so that students can work together on a table or other work surface. Each work station should be supplied with pre-cut strips of chromatography paper (1cm x 7cm), 1 strip of chromatography paper with a dot of the ink used to write the crime scene note, popsicle sticks, test tubes and a test tube rack. The markers, tape, water, paper towels and pencils should be collocated in a central location in the room.
2) Lesson Introduction: You can use the following script to introduce this activity to students and to set context for this activity relating to an overarching crime scene investigation. This introduction should occur prior to starting the activity.
- At the crime scene earlier today we found a note written by the perpetrator. Using the ink from this note we can use a process called paper chromatography to determine what type of marker was used to write the note. By doing this, we will be able to narrow the list of suspects.
- Paper chromatography works because many inks are actually made up of several pigments that are combined to make a particular color. Since different manufacturers of pens actually use different types and amounts of pigment, different markers have unique signatures. Chromatography is the method of separating materials from a mixture, like the pigments found in marker ink. When ink is exposed to certain solvents, like water - the universal solvent, the colors dissolve and can be separated. When we expose a piece of chromatography paper with ink on it to a solvent, the pigments spread across the paper at different rates.
3) Each team of students must first fill their test tubes with 2-3 ml of water; this should be about 1 cm deep in the test tube.
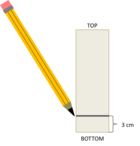
4) After filling their test tubes, teams should draw a straight line 3 cm above the bottom of one of the strips of chromatography paper (see image to the right).
5) Using one of the sample markers, teams should draw a small dot on the middle of the line they just drew.
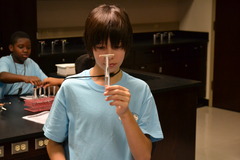
6) Then have students wrap the top 1 cm of the chromatography paper around a popsicle stick and tape it so that it stays. Students can write the brand of the marker on the popsicle stick.
7) After teams have successfully done steps 4-6 for the first marker, have them repeat these steps for the remaining sample markers and then wrap the control chromatography strip with the crime scene ink sample around a popsicle stick.
- At the end of this prep stage, teams should have all of the sample marker strips and the 1 crime scene marker strip wrapped around and taped to a popsicle stick with the names of the markers or "Crime Scene" written on the stick. Students should not move on to the next step until the successfully complete the above steps.
8) Without submerging the pencil line, members of each team should slowly lower each chromatography strip into a test tube so the tip of the paper is barely in the water and the popsicle stick is resting on the top of the test tube. It is VERY important that the sample dot stay above the water so if the strip is too long, have the teams re-tape their strips of paper so that they are not as long.
9) Teams will begin to see the water travel up the paper.
- Note: This is called capillary action. As the water is drawn up, it will carry the pigments in the sample up the strip at different rates. This is why students will begin to see the stripes of color on some of their samples.
10) When the water is 1 cm from the popsicle stick, instruct students to remove the strip from the test tube and lay them on a paper towel to dry.
11) Once they have removed all of the strips from the test tubes, campers should write down their observations in the table provided in their workbook and then decide which marker matches the sample from the crime scene.
Lesson Closing:
- What were your observations? (Ask each team of students to share their observations for 1-2 of the markers)
- What was your conclusion? What marker was used to write the crime scene note?
- What pigments make up the ink for the marker used to write the crime scene note?
Assessment/Evaluation:
Student performance during this activity can be assessed by the students' ability to follow appropriate chromatography procedures. Evaluation should also include the students' observations for each marker sample and the conclusion that these observations lead them to. Students should be able to answer the questions provided during the lesson closing and understand that marker ink is comprised of many different pigments and that markers can be identified using these pigments.


What other people said
Average Rating (0)
Log in or Join now to rate this activity!